Planning a Vegetable Garden
Planning a vegetable garden is an exciting endeavor that can yield fresh, nutritious produce right in your backyard. Whether you’re a first-time gardener or have a few seasons under your belt, success comes from thoughtful planning and understanding core gardening principles. This guide walks you through a step-by-step process to plan your garden layout and choose crops, along with narrative insights on key considerations like location, soil, sun, water, and crop rotation. You’ll also find helpful tips on companion planting, succession planting, maximizing space, and advice on avoiding common mistakes. Let’s dig in!

Planning a Vegetable Garden
The Veggie Show
Step-by-Step Garden Planning Process
1. Choose a Suitable Location
The first step is to pick the best spot for your garden. Most vegetables need plenty of sunlight – ideally at least 6 to 8 hours of direct sun each day. Observe your yard to find an area that isn’t shaded by trees or buildings. Also, check that the spot has well-draining soil; avoid areas where water tends to puddle after rain. Good drainage prevents roots from sitting in water and rotting. Having a water source nearby is important too – you’ll be more inclined to water regularly if you don’t have to haul hoses across the yard. If possible, choose a location sheltered from strong winds (a fence or hedge can provide wind protection) and make sure it’s easily accessible. A garden that’s convenient to reach (for example, near your kitchen door) will be easier to tend and harvest.
2. Decide on Garden Size and Type
Next, determine how large your garden will be and what format it will take. Be realistic about your available space, time, and experience. It’s often wise to start small – even a 4×4 foot plot or a few containers can grow a surprising amount of food. Starting with a modest size helps ensure you won’t become overwhelmed by maintenance. As you gain confidence, you can always expand in subsequent seasons. Consider the garden type that best suits your needs:
- In-Ground Garden: This traditional approach involves planting directly into your yard’s soil, which works well if you have ample space. In-ground beds can accommodate a wide variety of crops, but they may require more effort in soil preparation and weeding.
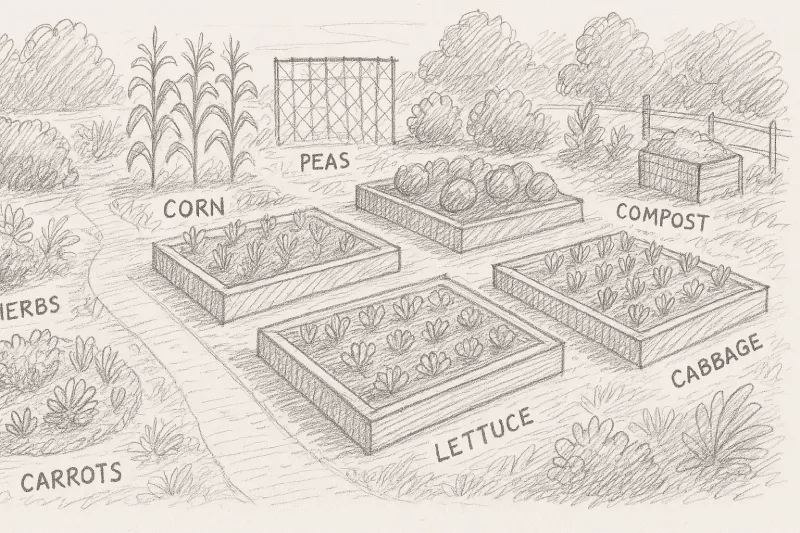
- Raised Beds: Raised beds are essentially large planting boxes filled with soil. They offer several advantages: improved drainage, less soil compaction, and easier control over soil quality. Raised beds can be very productive, especially in small spaces. They’re also easier on your back and knees, since the soil level is higher. Keep in mind raised beds might need more frequent watering due to better drainage. If you build multiple raised beds, leave pathways between them (2–3 feet) for easy access.
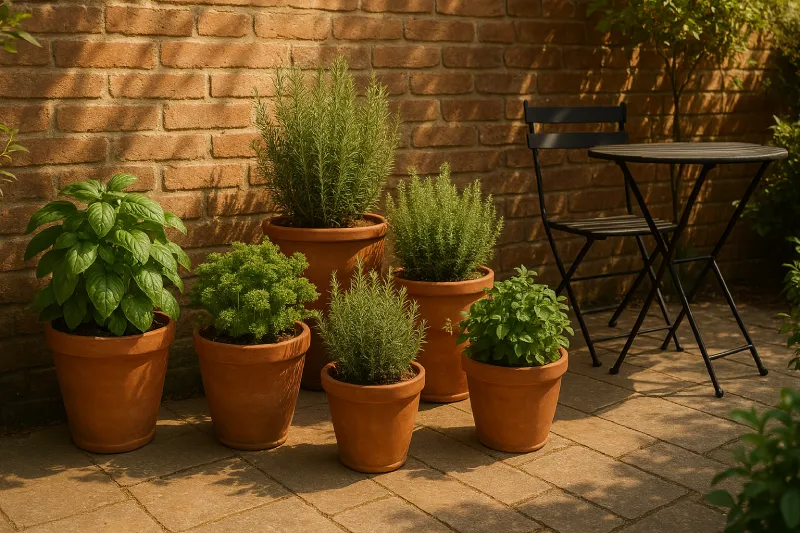
- Containers: If ground space is limited (for example, you only have a patio or balcony), container gardening is a great solution. Many vegetables and herbs grow well in pots or planters. Ensure containers have drainage holes and use high-quality potting mix. Remember that containers dry out faster than garden beds, so you may need to water them daily in hot weather.
Tip: If you have poor native soil or limited yard space, combining raised beds and containers can maximize your growing area. Even creative solutions like repurposed buckets or vertical planters can serve as mini-gardens.
3. Select Your Crops
ow comes the fun part – choosing what to grow. Start by considering what you and your family like to eat. It’s rewarding to grow vegetables that will actually end up on your plate. Also, think about your local climate and growing season. Opt for vegetables that will thrive in your conditions (temperature, rainfall, length of growing season). For example, if you have a short cool season, heat-loving plants like melons might struggle, whereas leafy greens or root veggies could do well. If you’re unsure, look up your agricultural zone or talk to local gardeners about what grows easily in your area (without getting too region-specific, the key is to match crops to your environment).
For beginners, it’s often best to choose a mix of reliable, easy-to-grow plants. Some beginner-friendly options include leafy greens (such as lettuce or spinach), bush beans, radishes, cherry tomatoes, and herbs. These tend to establish quickly and aren’t too fussy. Leafy greens and many herbs also do fine in partial shade or small containers, making them versatile choices. If you have more space and sun, you might try a couple of tomato or pepper plants (just be aware they require warm weather and some support stakes). Grow what you love to eat, but keep your list manageable; it’s better to do well with a handful of crops than to over-plant and become overwhelmed.
Tip: Think about seasonality when choosing crops. Some vegetables prefer cooler weather (spring/fall) and others need summer heat. Planning for a balance of cool-season and warm-season crops can extend your harvest (more on this under succession planting). Also consider disease resistance and pest resistance if those are issues in your area – choosing hardy varieties can save headaches.
4. Design Your Garden Layout
With your site selected and crop list in mind, it’s time to plot out where everything will go. A well-planned layout makes efficient use of space and keeps plants healthy. Start by sketching a simple garden map on paper. Mark where each crop will be planted and ensure you leave space for walking paths so you can reach every plant for watering, weeding, and harvesting. Key design considerations include:
- Plant Spacing: Crowding too many plants together is a common mistake. Overcrowding can lead to competition for nutrients, poor air circulation, and higher disease risk. Check the recommended spacing for each vegetable (seed packets and plant tags often provide this) and plan your layout accordingly. It may feel tempting to squeeze in extra seedlings, but give them room – your plants will reward you with better growth.
- Rows vs. Blocks: Traditional gardens often use long rows with space in between for walking. This works, especially for large plots, but rows can waste space in a small garden. Consider planting in blocks or beds instead of single rows. For example, rather than one long row of lettuce, you could plant a 3-foot by 3-foot block of lettuce in a staggered grid. Block planting (sometimes called “square-foot gardening”) minimizes bare soil and maximizes the number of plants in a given area. Just be sure you can still reach into the center of the block for harvesting.
- Tall vs. Short Plants: Plan your layout so that taller plants won’t cast too much shade on shorter ones that need sun. Typically, you’d place tall or trellised plants (like staked tomatoes, pole beans, or corn) toward the north or west side of the garden (in the Northern Hemisphere) so they don’t block sunlight from lower-growing crops. Shorter plants like carrots or bush beans can go in front. This way, everyone gets their share of sun.
- Companion Planting: Take advantage of natural plant partnerships. Companion planting is the practice of growing certain plants near each other for mutual benefit. Some plants make great neighbors – for example, basil grown alongside tomatoes is thought to improve tomato flavor and can help repel pests. Likewise, beans planted near corn can fix nitrogen in the soil that corn will use. Flowers and herbs can also be companions; marigolds or nasturtiums interplanted with veggies may deter pests (nasturtiums, for instance, can attract aphids away from your main crops). When designing your layout, consider pairing compatible plants in the same bed. A classic trio is the “Three Sisters” method: corn, beans, and squash grown together – corn provides support for bean vines, beans add nitrogen, and squash leaves shade out weeds. While you don’t need to use that exact trio, it shows how thoughtful pairing can maximize yields. (Be mindful to avoid known bad companions too – for example, keep beans away from alliums like garlic/onions, as they may stunt each other.)
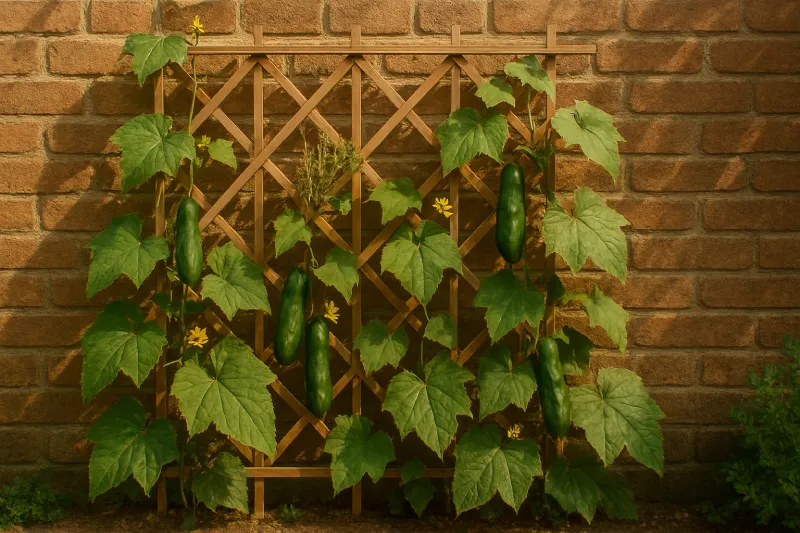
- Vertical Gardening: Use vertical space to your advantage, especially if you have a small garden. Instead of letting vining plants sprawl on the ground, train them upward on a trellis, fence, or stakes. Climbing crops like cucumbers, pole beans, peas, and even small varieties of squash or melons can be grown vertically. This not only saves ground space but also can improve yields by exposing the plants to more light and air. For example, a teepee of bamboo stakes can support pole beans, or a simple wire trellis can hold cucumbers. As a bonus, harvesting hanging fruits is easier on the back than stooping on the ground. In your layout sketch, mark where trellises or supports will go, and plan lower-growing plants around them (some leafy greens like lettuce can even enjoy the partial shade at the base of a trellis with climbing cucumbers above).
- Pathways: Ensure there are clear paths or stepping stones to access your plants. In a small bed, a stepping stone or two can allow you to reach the center without compacting the soil everywhere. In larger gardens, rows or narrow paths (~18-24 inches wide) should be left between blocks or beds. Adequate pathways prevent you from accidentally trampling plants and make routine tasks easier.
Tip: Sketch it out. Even a rough hand-drawn layout can help you visualize spacing and crop arrangement. This also becomes a handy reference when it’s time to plant. You might sketch approximate squares or rows for each crop, noting how many plants will fit. Don’t forget to label what is going where!
5. Plan for Crop Rotation
As you map your layout, think beyond the first season. Crop rotation means changing where you plant each type of vegetable from year to year, rather than growing the same thing in the same spot repeatedly. Why does this matter? Over time, many pests and diseases are attracted to specific plants. If you plant, say, tomatoes in the exact same patch every year, the pests and soil-borne diseases that love tomatoes will build up there, potentially causing more trouble each season. Rotation helps break these pest and disease cycles by moving the host plant. Additionally, different plants have different nutrient needs and contributions – rotating crops helps prevent the soil from getting depleted of any one nutrient and can even out fertility usage.
You don’t need an elaborate crop rotation plan for a home garden, but do avoid planting the same plant (or plant family) in the same spot two years in a row. For example, tomatoes, peppers, eggplant, and potatoes are all in the nightshade family – after growing any of them in a certain bed, follow up next season with a different family (like beans or lettuce or carrots, for instance) rather than another nightshade. A simple rotation cycle of 3-4 years is ideal to truly minimize pest buildup (meaning if you can, wait 3+ years before returning a given crop to its former spot). In a small garden this can be challenging, but even a basic rotation is helpful. To keep track, jot down notes or update your garden sketch each year with what was planted where. Over time, you’ll develop a rotation pattern. During your planning, you might label sections of your map as “leafy greens here this year, root crops next year,” etc., as a forward-thinking guide.
Tip: Group your crops by families for rotation purposes. For example, all cabbage, broccoli, kale belong to the Brassica family – plan to move that whole group together. Legumes (beans, peas) enrich the soil with nitrogen, so a nice rotation is to plant nitrogen-hungry plants (like corn or leafy greens) after beans or peas. Overwinter cover crops (like clover or rye) can also act as a rotation tool to rejuvenate soil, though that’s an advanced technique.
6. Plan for Succession Planting
To get the most out of your garden space and enjoy a continuous harvest, incorporate succession planting into your plan. Succession planting is the practice of planting new rounds of crops to replace those that have finished, so something is always growing and producing. There are a few ways to do this:
- Staggered Sowings: For crops that mature quickly or that you consume continuously (like lettuce, radishes, bush beans, or carrots), don’t plant all your seeds at once. Instead, sow a small batch every week or two over the course of several weeks. This way, you won’t end up with 30 heads of lettuce all ready in the same week – instead, you’ll have a few ready each week over a longer period. Your plan can note these intervals (e.g., “Plant row of lettuce every 2 weeks in spring”).
- Sequential Cropping: Plan a sequence of crops for one space through the season. For example, after you harvest a spring crop of peas or spinach (which prefer cool weather), you could use that same space to plant a warm-season crop like beans in early summer. Then after the beans are done, perhaps a fast-growing fall crop like spinach again or arugula could go in for late season. By replacing harvested crops with new ones, you extend your productive season. When making your garden map, you can indicate these sequences (pea bed -> later beans -> later greens, for instance).
- Different Maturity Dates: Another form of succession is interplanting a slow-growing crop and a quick crop together. For instance, you can seed radishes and carrots in the same row; radishes mature in about 4 weeks, carrots take much longer. You’ll pull the radishes out early, which gives the carrots room to grow bigger afterward. In your plan, this could be noted as “Radish/Carrot mix” in one area. This is both a companion planting and succession technique.
The goal is to avoid having any section of your garden sitting empty for long during the growing season, and to prevent a situation where everything ripens all at once and overwhelms you. By staggering plantings and planning follow-up crops, you create a rolling harvest that keeps your kitchen stocked continuously healthysoilorganics.com . When planning, be sure to account for your local frost dates and the days-to-maturity of each crop so you know what can follow what. (For example, if your first frost in fall is early, you wouldn’t plan a second planting of corn in August because it wouldn’t have time to mature.)
Tip: Keep some seeds in reserve for mid-season planting. Mark your calendar with reminders to plant the next round. Fast growers like lettuce, radish, dill, or cilantro are great for succession. Also, after pulling out an exhausted crop, refresh the soil with a bit of compost before replanting to give the new plants a boost.
7. Prepare Your Soil
Healthy soil is the foundation of a thriving vegetable garden. While this step comes later when you’re ready to work your garden bed, it’s worth planning for soil preparation early – you might need to gather materials like compost or have a soil test done. Test your soil to understand its baseline fertility and pH level. Many local extension offices or garden centers offer inexpensive soil test kits. The results will tell you if your soil is lacking in any major nutrients or if the pH (acidity/alkalinity) needs adjusting. Most veggies prefer a slightly acidic to neutral pH (~6.0 to 7.0). If the test shows the pH is off, plan amendments: lime can raise pH (if soil is too acidic) and sulfur can lower pH (if soil is too alkaline).
Next, enrich the soil by adding organic matter. Compost is a gardener’s best friend – work in a generous amount of well-rotted compost or manure to improve soil structure and nutrient content. Compost helps sandy soil hold moisture better and helps break up clay soil to improve drainage. If you don’t have your own compost, plan to purchase some or look for municipal compost programs. Aim to spread a layer of compost a few inches thick on top of your garden bed and mix it into the top 6-12 inches of soil before planting. Also consider other organic amendments based on needs: for example, if your soil test indicates low nitrogen, you might add some blood meal or a balanced organic fertilizer.
To further prepare the soil, loosen and aerate it. If it’s a new ground bed, you may need to dig or till the soil to break up compacted layers (especially if the ground has never been gardened). Work the soil when it’s moist but not waterlogged – if it’s too wet, wait, to avoid damaging soil structure. Remove any large rocks, roots, or weeds as you go. A garden fork or spade can be used to turn the soil over. For established raised beds, simple hand turning with a fork might suffice. Once loosened and amended, rake the surface smooth.
Finally, plan for mulching after you plant. Mulch (such as straw, leaves, or wood chips) spread on the soil surface helps retain moisture and suppress weeds. You might gather fall leaves or stockpile some straw ahead of time so you have mulch ready. Mulching fits into planning because you want to ensure you have the materials on hand when needed.
Tip: If your soil is very poor (too rocky, sandy, or contaminated), you might rely more on raised beds or imported soil for growing vegetables. Building the soil is an ongoing process – each year add more compost or plant cover crops to maintain fertility. Your plants will show their appreciation through bountiful harvests!
8. Plan Your Watering and Irrigation
Water is critical for vegetable gardens, so it pays to think about how you’ll provide it. Most vegetables need about one inch of water per week (roughly 2-3 cm), from rain or irrigation, for healthy growth. Consistency is key – too little water and plants get stressed; too much water and they can drown or develop rot. During hot summer spells, or if you have very free-draining soil, the need can be even higher. As you plan, consider these watering strategies:
- Irrigation Method: Will you water by hand with a hose or watering can, or install a more automated system like soaker hoses or drip irrigation? For a small garden or containers, hand-watering can be fine (just be prepared to do it frequently in dry weather). For larger layouts, drip irrigation or soaker hoses laid among the rows can save time and deliver water directly to the soil, which is efficient. Sprinklers are another option, but they wet the leaves which can sometimes promote disease. Many gardeners prefer drip lines under mulch for steady, gentle watering at the root zone.
- Water Scheduling: Plan to water deeply rather than shallowly. Deep watering encourages roots to grow down. It’s often best to water in the morning, which allows leaves to dry off during the day (damp leaves overnight can invite fungal diseases). Morning watering also ensures plants have moisture before the heat of midday. If morning isn’t feasible, early evening is second best (just try to avoid splashing water on foliage if possible). You might schedule certain days of the week for watering, depending on weather. Check the soil moisture by feeling it – the top inch or two should be slightly moist. If it’s dry, it’s time to water.
- Rain Considerations: Monitor rainfall using a simple rain gauge. If nature provides the inch of water in a week, you can skip irrigating. If not, you’ll know how much to supplement. During extremely rainy periods, ensure your garden isn’t waterlogged; good drainage (from earlier planning) will help with that.
- Mulch and Water Conservation: As mentioned, having a mulch in place will significantly reduce water evaporation from the soil, meaning you won’t have to water as often. Drip irrigation under mulch is one of the most water-efficient setups. If water is expensive or scarce in your region, plan your garden with water-efficiency in mind: choose some drought-tolerant veggies or herbs, use mulch, and possibly collect rainwater in barrels to use in the garden.
Tip: Make a note on your garden plan about how each area will be watered (e.g., mark which beds get a soaker hose line). Planning this out will ensure you have all the hoses, connectors, or watering tools you need before the hot summer arrives.
Maximizing Space in Small Gardens
Not everyone has a large yard for a sprawling vegetable patch. But even with a small garden, you can grow an impressive amount of produce by using smart techniques to maximize space. We’ve touched on several of these already, but let’s summarize and add a few more ideas for those working with limited room:
- Intensive Spacing: Instead of traditional long rows with wide walkways, use raised beds or block planting to concentrate your growing area. In raised beds, you don’t need space between each row for walking; you only need pathways around or between beds. That means the bed area itself can be planted more densely (following spacing guidelines, but in a grid or offset pattern). For example, a 4x4 foot raised bed can fit a grid of 16 lettuce plants (in a 1 foot square spacing each) or dozens of carrots in closely spaced rows. Utilize the entire bed, leaving just enough gap to reach in for harvesting. Remember to group plants with similar water and sun needs in the same intensive bed to make care easier.
- Choose Compact Varieties: When space is tight, variety selection matters. Many common veggies have dwarf or compact varieties bred for small spaces or container growing. Look for keywords like “bush”, “compact”, “patio”, or “mini” in seed catalogs. For example, bush tomatoes and bush cucumbers stay smaller than indeterminate vining types. There are peppers that only get 2 feet tall, or bush beans that don’t vine. While this guide doesn’t dive into specific varieties, keep in mind that opting for space-efficient plant types lets you grow more in a cramped area.
- Utilize Edges and Odd Spaces: A small garden can be tucked into surprising places. Grow herbs or shallow-rooted greens in window boxes or along the edges of flowerbeds. If you have a decorative bed, maybe there’s room to slip in some chard or kale among the ornamentals (edible landscaping). Use vertical layers: perhaps a planter on a stand beneath which you can place smaller pots. If you have a fence with sun on it, vining veggies can climb it. Tuck in plants wherever you find a suitable spot – just ensure they’ll get enough light and the soil or container is good. Even the strip of soil by a driveway or the side of the house might support a row of bush beans or a tomato in a pot. Creativity is key in maximizing a small space.
- Keep it Manageable: While maximizing space, don’t forget manageability. It’s easy to over-plant every inch and then feel overwhelmed by a jungle of plants. Make sure you can still reach and care for everything. Sometimes leaving a little elbow room can be beneficial if it means you can navigate your garden. Strive for a balance between efficient use of space and a garden that’s inviting to work in.
Remember, a well-tended 100 square foot garden can out-produce a messy, neglected 500 square foot one. So, maximize space by clever design and techniques, but also maximize your ability to maintain that space. With these approaches, even a small garden can be amazingly productive, providing you with fresh veggies and herbs all season long.
