Pest and Disease Control in the Vegetable Garden
Aphids
Aphids are small (1–3 mm), soft-bodied insects that suck sap from plants. They reproduce rapidly and can infest a wide range of vegetables (tomatoes, peppers, cabbage, etc.). Large infestations weaken plants and may transmit plant viruses.
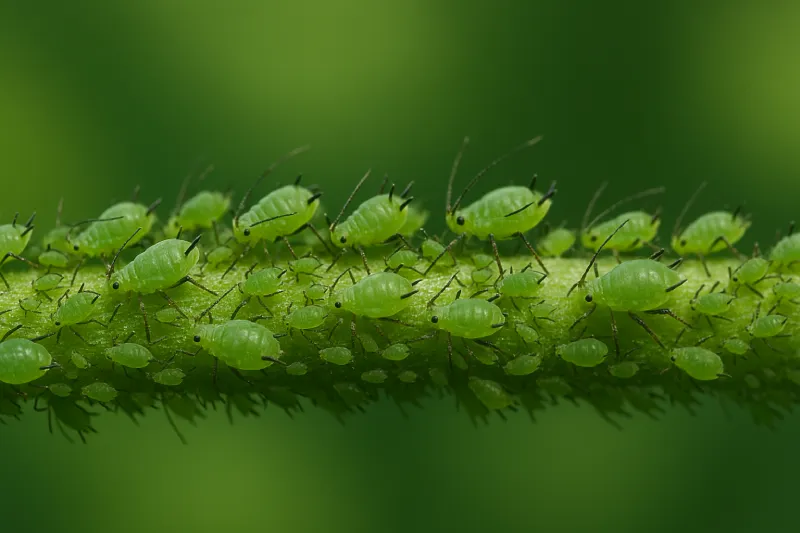
Identification: Look for clusters of tiny green, black, or gray insects on new shoots and undersides of leaves. Infested leaves may curl, yellow, or become distorted, and the plant’s growth is stunted. A sticky residue (honeydew) on foliage is common; this can lead to black sooty mold growth on leaves.
Prevention: Encourage natural aphid predators like ladybugs and parasitic wasps in your garden, and avoid over-fertilizing with nitrogen (excess tender growth attracts aphids). Use row covers on young plants to exclude winged aphids. Inspect new plants for aphids before introducing them.
Treatment: For small infestations, knock aphids off plants with a strong water spray every few days. On sturdier plants, wipe off or prune away heavily infested leaves. Insecticidal soap or a mild soapy water spray is an effective organic treatment – it kills on contact but has no residual effect (avoid using on heat-stressed or sensitive plants). Neem oil is another organic option that repels and disrupts aphids. You can also release lady beetles or lacewings to consume aphids; these beneficial insects can significantly reduce aphid populations. Chemical insecticides are rarely needed for aphids and may worsen problems by harming beneficial insects (aphids quickly develop resistance to many pesticides). Reserve chemical sprays for only severe infestations that do not respond to organic methods.
Cabbage Worms (Cabbage Loopers & Imported Cabbageworms)
Cabbage worms are green caterpillars that are the larvae of white or brown moths/butterflies (such as the small white cabbage butterfly). They voraciously feed on brassica family crops like cabbage, kale, broccoli, and cauliflower, chewing large holes in leaves. These pests can hide along leaf veins and are well-camouflaged.
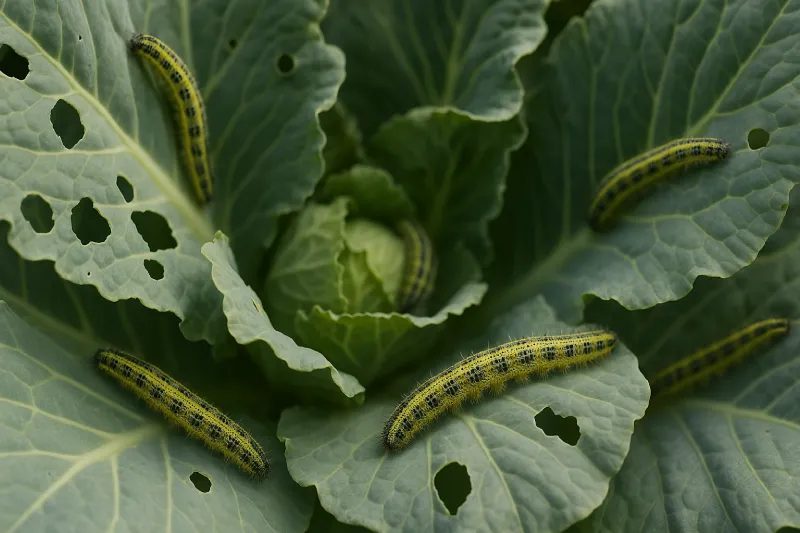
Identification: Check the undersides of leaves for small yellow or white egg clusters and the leaves for dark green fecal droppings (frass). The larvae themselves are velvety green caterpillars (around 2–3 cm long) that often inch along. Feeding damage appears as irregular holes in foliage; in heavy infestations, only leaf ribs may remain. Presence of the white cabbage butterflies fluttering around your plants is a sign to inspect for eggs/larvae.
Prevention: Use floating row covers over brassica beds to prevent butterflies from laying eggs on the plants. Delay planting by a couple of weeks if possible to avoid peak egg-laying periods. Practice crop rotation and remove plant debris after harvest to disrupt the life cycle. Companion planting with strong-scented herbs or flowers (like dill or marigold) may deter egg-laying.
Treatment: Hand-picking is very effective for cabbage worms – inspect plants regularly and remove any caterpillars (drop them into soapy water to kill them). For larger infestations, apply Bacillus thuringiensis (Bt) spray, a naturally occurring soil bacterium that specifically kills caterpillars but is safe for other wildlife. Bt is an organic solution that works best on younger larvae. Another organic insecticide option is spinosad, which is derived from soil bacteria and can control caterpillars. If caterpillars persist, you can reapply Bt or spinosad according to label directions. Also, look for white, rice-like cocoons on any larger caterpillars – these indicate beneficial parasitic wasps have attacked them, so leave those caterpillars to ensure the wasps complete their life cycle (helping reduce the pest). Chemical insecticides are generally unnecessary unless the infestation is severe; if needed, use a product labeled for caterpillars on edible crops as a last resort.
Tomato Hornworms
Tomato hornworms are the large (up to 10 cm) green caterpillars of hawk moths. They commonly attack tomatoes, peppers, and eggplants, consuming leaves, stems, and even green fruit. A few hornworms can defoliate a tomato plant in short order, so early control is crucial.
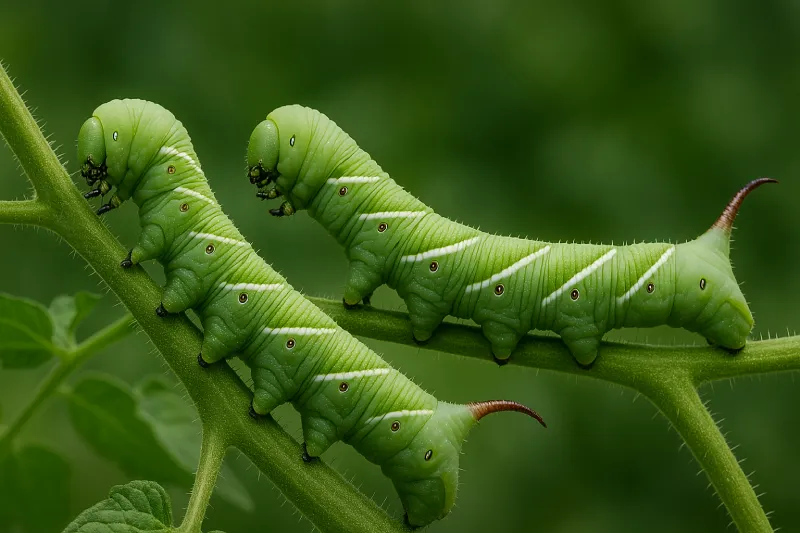
Identification: Hornworms are bright green with white diagonal stripes and a distinctive horn-like tail spike (they look fierce but do not sting). Early signs include dark green droppings on foliage and missing leaves or chewed stems. Often, the caterpillar itself is hard to spot due to its camouflage; it tends to cling to stems on the interior of the plant. If you see stems stripped of leaves or gouges in tomatoes, search for this large caterpillar. They are easiest to find at dawn or dusk, or by using a UV blacklight at night – hornworms glow faintly under UV light, making them easier to spot.
Prevention: Till or turn over soil at season’s end to destroy overwintering pupae in the soil. In spring, inspect young plants regularly for the greenish-yellow eggs on the underside of leaves and remove them. Interplanting dill or basil with tomatoes may help repel adult moths. You can also use companion flowers like marigold or nicotiana to attract predatory insects. For proactive control, some gardeners introduce Trichogramma wasps (tiny parasitic wasps) which prey on hornworm eggs.
Treatment: Hand-pick hornworms off your plants as soon as you notice them (they are large and easy to pluck off once found). This is often the fastest and most effective solution in backyard gardens. Drop them into a bucket of soapy water or crush them to kill them. If hand-picking is difficult due to their camouflage, use a flashlight in early morning to find them, or the blacklight method at night. For ongoing issues, you can apply Bacillus thuringiensis (Bt) as an organic spray; Bt is most effective on younger hornworms and will not harm beneficial insects. Another option is applying neem oil or spinosad to foliage, which can help repel or kill feeding larvae. Often, natural predators help out: be aware of hornworms carrying white braconid wasp cocoons (tiny white oblong bumps on the hornworm’s back) – those caterpillars are already parasitized by wasps that will kill them, so leave those in the garden to boost natural control. Chemical insecticides should be unnecessary for hornworms in most cases; use them only if an infestation is overwhelming and other methods have failed (and follow safety instructions for edible plants).
Slugs and Snails
Slugs and snails are soft-bodied mollusks (slugs have no shell; snails have a spiral shell) that thrive in damp conditions. They feed at night on tender leaves, stems, and fruits. These pests are especially problematic for leafy greens, seedlings, and low-growing vegetables, often leaving large ragged holes and slime trails in their wake.
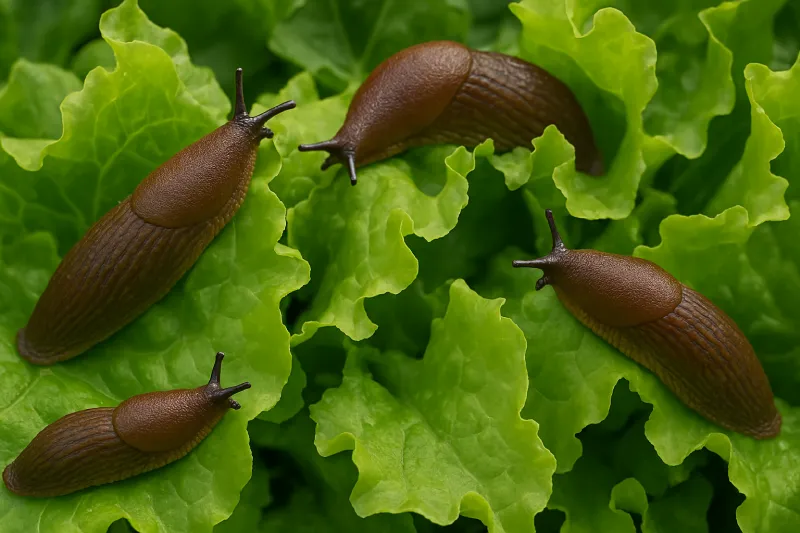
Identification: Look for irregular holes chewed in leaves, especially on seedlings and low leaves, often with slimy mucus trails on the soil or foliage. Damage usually appears overnight. Slugs themselves are gray, brown, or black slimy creatures that range from 1–2 cm (for small field slugs) up to 8–10 cm (for large slugs like the brown snail or leopard slug). They are often found in early morning or on rainy days, hiding under boards, pots, or dense plant canopies during daytime. Snail damage is similar, but you may find the snail’s shell or the snail itself at dawn or dusk on plants.
Prevention: Eliminate hiding spots and excess moisture. Keep the garden free of heavy mulch, leaf litter, and debris where slugs shelter during the day. Water in the morning rather than evening, so the soil surface is dry at night when slugs are active. You can place copper tape or copper strips around raised beds or plant pots – contact with copper deters slugs and snails via a mild electric effect. Some gardeners also use rough barriers (crushed eggshells, diatomaceous earth, coffee grounds) around plants; these are only partially effective, but in small gardens they can help. If slugs are a yearly problem, consider applying beneficial nematodes (Phasmarhabditis species) to the soil – these microscopic worms seek out and kill slugs, and are safe for organic gardens.
Treatment: Hand-picking at night (with a flashlight) can significantly reduce slug populations – drop collected slugs/snails into a container of soapy water to drown them. Set out beer traps: bury a shallow dish or jar lid near plant level and fill it with beer; slugs are attracted and will drown in it. Check and empty traps regularly. For persistent infestations, use iron phosphate slug baits, which are OMRI-listed for organic use. Iron phosphate baits (sold under names like Sluggo) are effective and far less toxic than traditional metaldehyde baits. Scatter these granules around vulnerable plants; slugs eat them, stop feeding, and die a few days later. (Always follow label directions for any bait to avoid risks to pets or wildlife.) Avoid old-style metaldehyde slug baits if possible – while they work, they are poisonous to pets/wildlife and can harm the environment. In a moist garden, reapply controls as needed because new slugs can always wander in. Persistence is key: combining hand-picking, traps, and safe baits will gradually bring slug numbers down.
Whiteflies
Whiteflies are tiny (1–2 mm) white winged insects, closely related to aphids, that often infest the undersides of vegetable leaves (especially on tomatoes, peppers, eggplants, squash, and greenhouse crops). They feed by sucking plant sap, and can rapidly reproduce in warm weather. Clouds of whiteflies will fly up when an infested plant is disturbed. Like aphids, they excrete honeydew, leading to sooty mold on foliage. Heavy infestations can stunt plants and cause leaf yellowing.
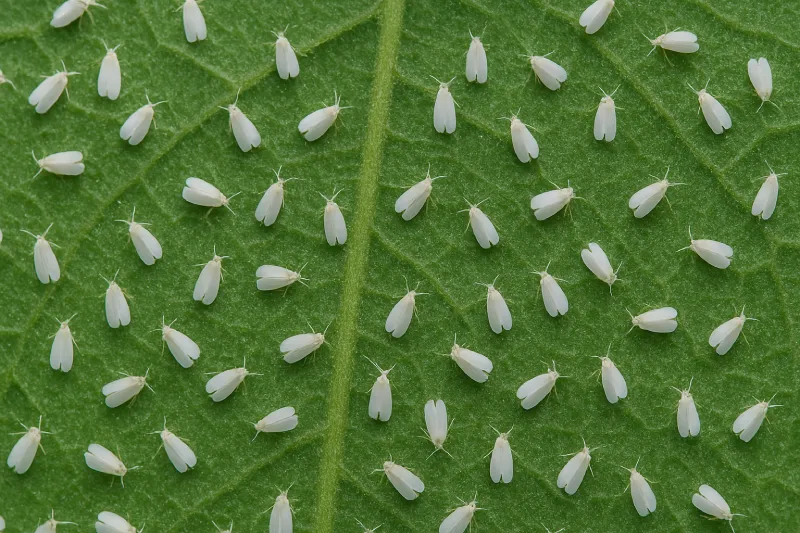
Identification: Check the undersides of leaves for clusters of tiny, wedge-shaped white insects. Early signs include leaves that turn pale or mottled from sap loss. If you shake the foliage, a flurry of minute white “moths” will lift off the plant. Also look for sticky honeydew on leaves and the growth of black sooty mold (a fungal coating) as a secondary sign of whitefly infestation (also common with aphids).
Prevention: Preventing whiteflies is easier than curing an infestation. Inspect new transplants or indoor-started seedlings for whitefly and eggs before moving them into the garden. Use reflective mulch or aluminum foil strips around plants – the bright reflection can confuse and repel whiteflies. Intercropping with companion plants can also help; for example, planting nasturtiums near tomatoes or cucumbers is thought to deter whiteflies, possibly by releasing airborne chemicals that repel them. Keep the area free of weeds, as whiteflies often breed on nearby weeds. In greenhouses or enclosed gardens, consider installing fine insect mesh on openings.
Treatment: Tackle whiteflies as soon as noticed. Begin by spraying the undersides of leaves with water to dislodge eggs and nymphs – a strong jet can reduce their numbers and also wash off honeydew. Yellow sticky traps placed around the plants are very useful for monitoring and trapping adult whiteflies (they are attracted to yellow). For a mild infestation, this plus removing heavily infested leaves may suffice. In case of larger infestations, use insecticidal soap or a neem oil spray on leaf undersides; these are effective organic options that kill nymphs/flies on contact. Repeat applications every 5–7 days, since whiteflies hatch rapidly. Introduce or encourage natural predators: ladybird beetles (ladybugs), green lacewing larvae, minute pirate bugs, and especially the tiny parasitic wasp Encarsia formosa are all enemies of whiteflies. In a greenhouse, Encarsia wasps are commonly released as a biocontrol to parasitize whitefly nymphs. Be cautious with broad-spectrum insecticides, as whiteflies quickly develop resistance and such sprays can kill the beneficial insects that keep whiteflies in check. Chemical pesticides (often neonics or pyrethroids) are a last resort – if used, opt for ones labeled for whitefly and try to choose a more selective product to spare beneficials. Always wash vegetables thoroughly after treatment and before consumption.
Spider Mites
Spider mites (such as the two-spotted spider mite) are tiny spider-like arachnids (about 0.5 mm) that infest many vegetables, especially during hot, dry conditions or in greenhouses. They feed by piercing leaf cells and sucking out the juices, which causes a characteristic speckled or stippled appearance on leaves. Severe infestations lead to leaf yellowing, bronzing, and eventual drop. They get their name from the fine cobweb-like webbing they produce on the undersides of leaves when populations are high. Common host plants include beans, cucumbers, tomatoes, eggplants, and strawberries.
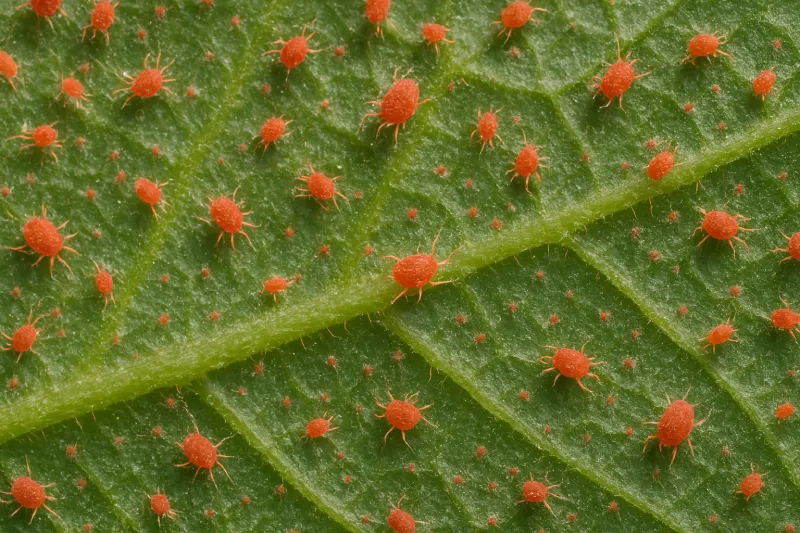
Identification: Because spider mites are so small, the damage is often noticed first. Look for leaves with a fine stippling or flecked yellow spots – this “sandblasted” look is caused by mites sucking out chlorophyll. The underside of leaves may have very fine, silken webbing (more visible when infestations are heavy). With a magnifying lens, you might see tiny moving dots (red, green, or yellowish) on the underside; these are the mites. If you suspect spider mites, tap a leaf over a sheet of white paper – you’ll see tiny specks fall and move slowly (mites). Plants become pale, and leaves may curl or turn bronze and drop if mites are not controlled.
Prevention: Spider mites thrive in dry, dusty conditions, so keep plants well-watered (without overwatering) and periodically mist or hose down foliage during hot weather to increase humidity and knock off mites. Avoid stressing plants – healthy, unstressed plants are more resistant. Space plants properly for good airflow, and regularly remove dust from greenhouse surfaces. Inspect the underside of leaves often, especially in mid-summer, so you can catch an infestation early. If you notice a few mites, remove and destroy those leaves or isolate the affected plant to prevent spread. Avoid using broad-spectrum insecticides, as they can kill mite predators and actually trigger spider mite explosions.
Treatment: At first sign of mites, spray plants with a strong water jet, focusing on the undersides of leaves, to knock mites off and destroy their webs. Do this every few days – water is a simple and effective organic deterrent. Follow up with insecticidal soap or neem oil spray on leaf undersides; these treatments smother mites and their eggs. (Avoid using sulfur or oil if temperatures are very high, to prevent leaf burn.) For severe infestations, you can purchase and release predatory mites (such as Phytoseiulus persimilis) which prey on spider mites. These beneficial mites can dramatically reduce spider mite populations in greenhouses or enclosed gardens. In open gardens, also encourage predators like ladybugs and lacewings which eat mites. Remove and destroy heavily infested leaves or whole plants if necessary to stop mites from spreading. Because spider mites can develop resistance, rotate between different control methods (water spray, soap, neem, etc.) each week. Chemical miticides are available but should be a last resort; many are quite toxic and mites can quickly develop resistance to them. Try to solve the environmental cause (low humidity, plant stress) while treating, as long-term control depends on making conditions less favorable for spider mites.
Cutworms
Cutworms are night-active caterpillars (larvae of certain moths, often in the genus Agrotis) that live in the soil and cut down young seedlings by chewing through stems at ground level. They typically attack at night, often severing the seedling’s stem outright and dragging the cut top underground to eat. These pests can wipe out an entire row of newly planted vegetables if not managed. The larvae are usually gray, brown, or greenish and curl up into a C-shape when disturbed, about 2.5–5 cm long.

Identification: If your seedlings are fine one day and toppled the next morning, cutworms are a prime suspect. Typically, you’ll find seedlings cut off at the base, laying on the soil with the stems “snipped.” Sometimes the upper part may be missing entirely (pulled underground). To confirm cutworms, dig 2–3 cm into the soil near the damaged plant — the fat, curled caterpillar is often just below the surface, usually close to the severed plant. They often hide in the soil or under debris near plants during the day.
Prevention: Before planting, till or turn over the garden soil to expose and kill any overwintering cutworm larvae or pupae. Keep the garden free of weeds for a couple weeks prior to planting – this starves cutworms and discourages moths from laying eggs. Plant collars offer excellent protection: place a collar made of cardboard, aluminum foil, or a 5–8 cm section of plastic pipe around each transplant, pressed a couple centimeters into the soil. This barrier prevents cutworms from reaching the tender stem. You can also stick a toothpick or a small wooden stick into the soil right up against each stem; this makes it harder for a cutworm to wrap around the stem to cut it. Practice crop rotation so that susceptible seedlings aren’t planted in the same spot each year.
Treatment: If you notice cutworm damage, search the soil around affected plants and hand-remove any cutworms you find (they will be curled up a few centimeters down). Evening inspections are useful: go out after dark with a flashlight and you may catch cutworms actively feeding, which you can then remove. After finding one, check the surrounding soil – there are often only a few doing most of the damage. For ongoing issues in a garden bed, you can apply beneficial nematodes to the soil (they will hunt cutworms as well as other soil pests). Some gardeners also use homemade bait by mixing bran with a little molasses and Bacillus thuringiensis (Bt) and sprinkling it around plants to attract and kill cutworms organically. If despite preventive measures cutworms persist, consider a targeted application of an appropriate insecticide to the soil surface in the evening (such as a product containing carbaryl or bifenthrin, as labeled for cutworms) – this is rarely needed in home gardens. Usually, a combination of collars, cleanup, and hand-picking resolves the issue without chemical use.
Colorado Potato Beetles
The Colorado potato beetle is a notorious pest of potatoes, tomatoes, eggplants, and related crops. Adults are round, yellow-orange beetles about 1 cm long with 10 distinctive black stripes on their wing covers. The larvae are plump reddish grubs with black heads and spots. Both adults and larvae feed on foliage and can rapidly defoliate plants if unchecked. Multiple generations can occur in one season, and the beetles overwinter in soil, emerging in late spring.
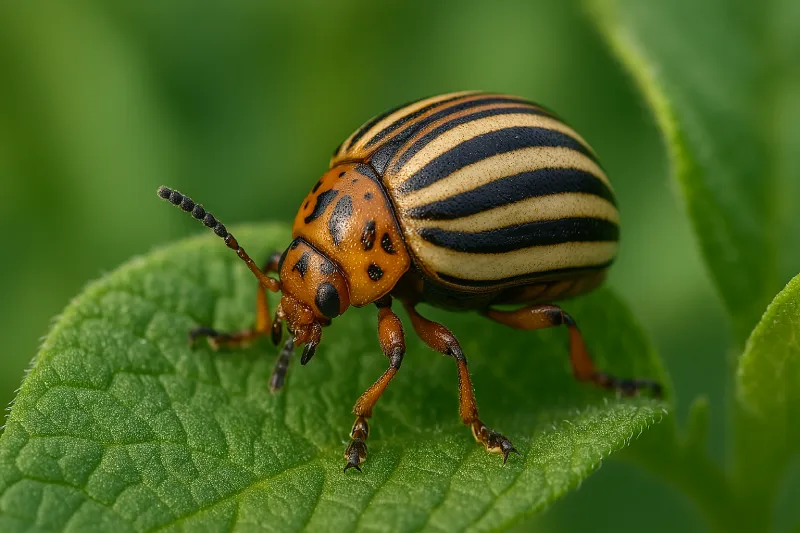
Identification: Adult beetles are easy to spot with their yellow-and-black striped backs. They often appear in late spring, right when potato plants are a few inches tall. The adults and the soft-bodied, humpbacked larvae chew irregular holes in leaves; larvae typically feed in groups and can skeletonize foliage. The reddish-orange larvae grow up to 8 mm and have two rows of black spots on each side. You might first notice clusters of bright orange eggs glued to the underside of leaves. Also, the presence of numerous ladybug-sized beetles on potato or eggplant foliage is a telltale sign. Defoliation starting from the top of the plant downward is characteristic of a potato beetle infestation.
Prevention: Crop rotation is the most effective cultural control – avoid planting potatoes or other host plants in the same spot as last year. Rotate with non-host crops (like beans or corn) for 1–2 years if possible. This forces emerging beetles to travel farther and results in fewer finding the new crop (studies showed rotation can reduce early-season beetle numbers by over 95%). At planting time, consider covering rows with row cover fabric to exclude beetles (remove covers when plants flower if they need pollination). After harvest, remove or deeply bury potato cull piles and volunteer potatoes, as these harbor overwintering stages. Applying a thick layer of straw mulch around potato plants can make it harder for beetles to locate the plants and also encourages ground beetle predators. Regularly scout your plants early in the season for any sign of beetles or their eggs. Handpick any orange-yellow egg clusters you find on the undersides of leaves to prevent them from hatching.
Treatment: Hand-picking can keep populations in check in smaller gardens. Daily or weekly, knock the adult beetles into a bucket of soapy water (they often fall when disturbed, so you can hold the bucket under the plant and tap the stem). Also squish any egg clusters and larvae you find. This manual approach can be very effective if done diligently. For a heavier infestation, use a biological insecticide: a strain of Bacillus thuringiensis (Bt var. tenebrionis) is available specifically for Colorado potato beetle larvae, which, when sprayed on foliage, will kill young larvae after they ingest it. Another option is spinosad (a natural soil bacterium product) which is effective against larvae as well. Neem oil sprays can act as an antifeedant – neem won’t immediately kill beetles, but it can deter feeding and egg-laying (though high concentrations might affect plants). Beauveria bassiana, an entomopathogenic fungus, is a biological pesticide that can infect and kill potato beetles; it’s been shown to work especially well when combined with Bt for integrated control. In fact, a multi-pronged approach (crop rotation, hand-picking, and targeted bio-insecticides) often yields the best results. If these methods fail and the damage is severe, you may resort to chemical insecticides labeled for potato beetles – however, be aware that Colorado potato beetles have developed resistance to many chemicals over time. If using a conventional pesticide, rotate among different active ingredients to mitigate resistance, and always follow the label for safe use on food crops. Remember to also protect beneficial insects in your garden; apply any spray in the evening when pollinators are not active, and target only the affected plants.
Powdery Mildew
Powdery mildew is one of the most common fungal diseases in vegetable gardens, affecting cucumbers, squash, melons, peas, tomatoes, peppers, and many other plants. It is caused by a group of fungi (order Erysiphales) that grow on the surface of leaves. True to its name, it appears as white, powdery patches on leaves, stems, and sometimes fruits. Unlike many fungal diseases, powdery mildew thrives in warm dry weather with high humidity (it does not require leaf wetness to spread). It can weaken plants by impairing photosynthesis, leading to reduced yields and quality.
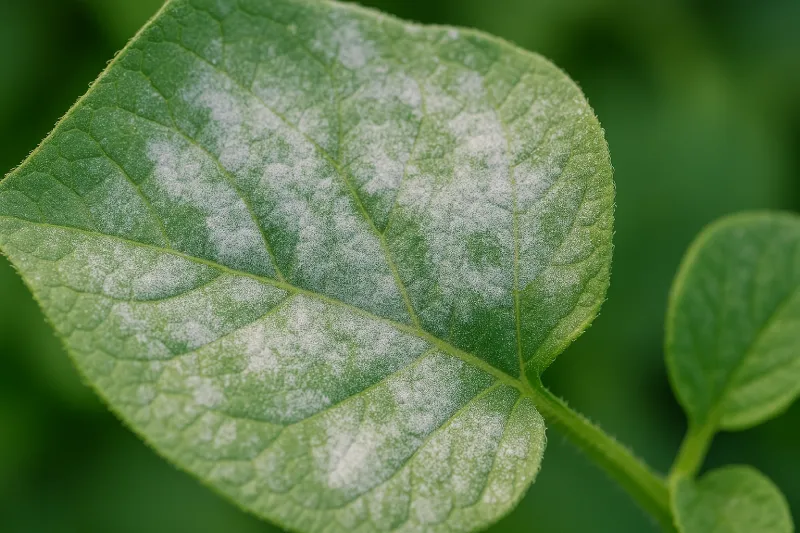
Identification: Powdery mildew is one of the easiest plant diseases to recognize. Early on, you’ll see small white or grayish fuzzy spots on the top of leaves that look like talcum powder or flour dust. These spots spread and can merge to cover large areas of the leaf with a white powdery coating. Infected leaves may gradually turn yellow, dry out, and become brown and papery. Unlike many leaf diseases, powdery mildew usually does not cause conspicuous spots of dark dead tissue; the white fungal growth is the most obvious sign. It often starts on lower or inner leaves in shady areas and can spread upward. Flowers and fruit can also get a powdery coating in severe cases. Because the fungus stays superficial, leaves feel slightly fuzzy but not usually slimy or water-soaked.
Prevention: Choose mildew-resistant varieties of plants when available (seed catalogs often list resistance to powdery mildew for cucumbers, squash, etc.). Provide plenty of space between plants and prune for good airflow – reducing humidity around foliage helps limit mildew growth. Avoid overhead watering in late afternoon or evening; instead water at the base of plants to keep leaves dry. In greenhouse or hoop house conditions, venting to reduce humidity is important. Remove and destroy any infected plant debris at the end of the season to reduce overwintering spores. Crop rotation and avoiding planting susceptible species in the same spot year after year can also help.
Treatment: Act quickly at the first sign of powdery mildew to stop it from spreading. Remove and destroy (do not compost) heavily infected leaves to reduce spore load. For organic treatment, several options are effective: Neem oil sprays can suppress powdery mildew by inhibiting the fungus’s growth. A homemade remedy used by gardeners is a baking soda solution (e.g. 1 teaspoon baking soda plus a few drops of liquid soap in 1 liter of water) – this can change leaf surface pH and prevent fungal growth (test on a small area first, as it can burn some plants). Another proven organic treatment is milk spray: dilute 1 part milk (any kind, even skim) in 9 parts water and spray on all leaf surfaces in direct sun every week. Studies have found milk sprays as effective as conventional fungicides for powdery mildew control on squash and pumpkins. Continue applications weekly or after rain. Sulfur and copper are traditional fungicides allowed in organic gardening; sulfur prevents spores from germinating (apply before disease appears or at first sight), and copper-based fungicides can protect new growth – use these with caution, as overapplication can harm plants or beneficial microbes. If the mildew persists or spreads rapidly, you may need to resort to a chemical fungicide. Look for fungicides containing myclobutanil or triforine, which are effective on powdery mildew – begin spraying at first symptoms and repeat as directed. However, try to limit chemical use to severe cases, as powdery mildew can often be managed with the organic methods above if caught early. Important: Do not apply sulfur or oil-based products in extreme heat or mix them together, as this can injure plants. Always follow label instructions for any fungicide regarding safe intervals before harvest.
Tomato & Potato Blight (Late Blight)
“Blight” on tomatoes and potatoes usually refers to late blight, caused by the pathogen Phytophthora infestans. This devastating disease was responsible for the Irish potato famine and remains a serious problem. Late blight can infect tomatoes, potatoes, eggplant, and related species. It spreads quickly in cool, wet weather, producing spores that travel on wind and water. The disease can rot tomato fruits and potato tubers, and can kill plants outright within a week or two under favorable conditions.
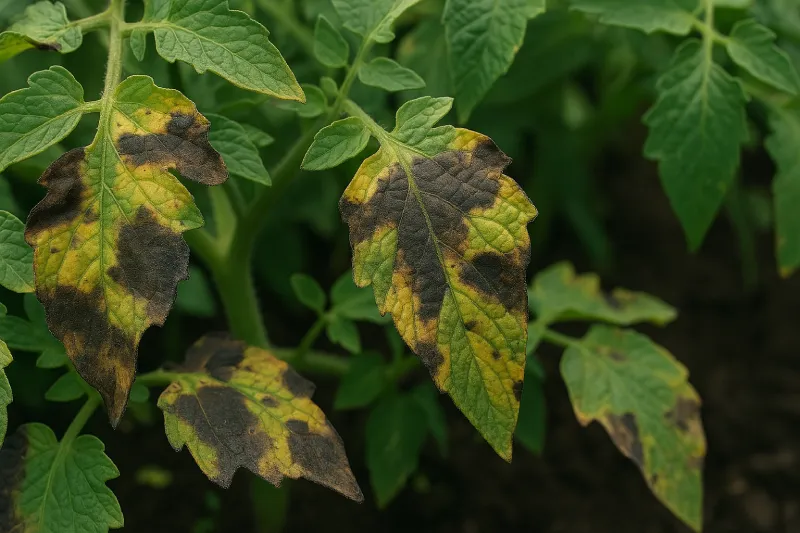
Identification: Early symptoms of late blight on tomatoes and potatoes are dark, water-soaked blotches on leaves, often starting at leaf edges or tips. These spots enlarge rapidly and turn brown or black. In humid conditions, whitish-gray fuzzy mold appears on the undersides of infected leaves (this is the spore production of the blight). Stems can also develop dark lesions. Infected foliage tends to collapse and shrivel soon after the mold is visible. On green tomatoes, blight causes hard, brownish-gray spots that may spread over the fruit; white fuzz can emerge on these spots under moist conditions. Potato tubers infected with late blight show firm brown or purple patches on the skin and a reddish-brown rot underneath, which often leads to a smelly, mushy decay as secondary bacteria invade. In contrast, early blight (caused by Alternaria fungi) causes concentric ring dark spots on older tomato leaves, but does not produce the white fuzzy growth – so the presence of white downy mold on lesions is a key sign of late blight. Late blight progresses fast – an entire tomato plant can go from healthy to brown and collapsing in a matter of days during cool, rainy weather.
Prevention: Because late blight is weather-driven, watch forecasts – extended periods of cool (≈12–18°C) and wet conditions are high-risk times. Plant resistant varieties if available (some modern tomato varieties offer partial resistance to late blight). Practice crop rotation: do not plant tomatoes or potatoes in the same soil that had either crop in the past 2–3 years if late blight has been an issue. Immediately remove volunteer potato or tomato plants from the garden (they can harbor the pathogen). Stake or cage tomato plants to improve airflow and get foliage up off the ground; avoid overhead watering to keep leaves dry. When watering, target the soil at the base of the plant. Ensure good spacing between plants to reduce humidity. In potato beds, at the end of the season, remove all potato tubers from the soil; even small forgotten tubers can harbor the pathogen overwinter. Destroy any cull potatoes or self-sown tomato seedlings. Preventative sprays of copper-based fungicide can be used in climates prone to blight – start spraying before or at the first sign of disease and repeat during cool, wet spells to protect plants. (Copper is allowed in organic production within limits, but use it sparingly to avoid soil buildup.)
Treatment: Once late blight infection is confirmed, act immediately to remove sources of spores. Promptly remove and destroy infected leaves or plants – bag them in plastic and dispose of them (do not compost, as spores can survive). If only a few leaves are affected and weather is forecast to dry out, you might prune out diseased foliage and treat remaining plants. However, if the infection is widespread or weather remains wet, it’s often best to pull up and destroy the entire infected plant to protect neighboring plants. Adjacent healthy plants should be treated with a protectant fungicide. Organic options include copper hydroxide or copper sulfate sprays (apply thoroughly to all foliage; copper can help prevent new infections on healthy tissue). There are also phosphate salts (phosphorous acid) based fungicides and some oil-based biofungicides that can slow blight spread in organic systems. These work best as preventatives. For gardeners open to chemicals, chlorothalonil is a commonly used fungicide for late blight on tomatoes/potatoes – it must be applied before or at first sign of disease to be effective. Other conventional fungicides (mancozeb, fluazinam, etc.) exist, but many are not for home garden use or have long pre-harvest intervals. Always check that any fungicide is labeled for use on the crop you intend and follow safety guidelines. During the season, if blight appears, increase plant spacing if possible by removing some plants, and avoid wetting foliage. In potatoes, “vine kill” (cutting or killing the potato foliage) a couple weeks before harvest can help any lingering spores die off and not infect tubers. Unfortunately, there is no cure for a plant already heavily infected with late blight – the focus should be on removing infected material and protecting remaining plants. After an outbreak, do not plant tomatoes or potatoes in that area the next year; the pathogen can persist in soil via infected tubers, so crop rotation and vigilant cleanup are critical.
Mosaic Virus
Mosaic viruses (such as Cucumber Mosaic Virus, Tomato Mosaic Virus, etc.) are a group of viral diseases that cause mottled, patchy coloration on leaves and distorted growth in vegetables. One of the most common is Cucumber Mosaic Virus (CMV), which despite its name infects not just cucumbers but over a thousand plant species including squash, melons, tomatoes, peppers, beans, and lettuce. Mosaic viruses are typically spread by insect vectors like aphids (in a rapid, non-persistent manner – an aphid can acquire the virus from an infected plant and transmit it within minutes). They can also spread by contaminated hands or tools, and some (like Tobacco Mosaic Virus) via seeds. Once a plant is infected, there is no cure; the virus interferes with the plant’s normal growth.
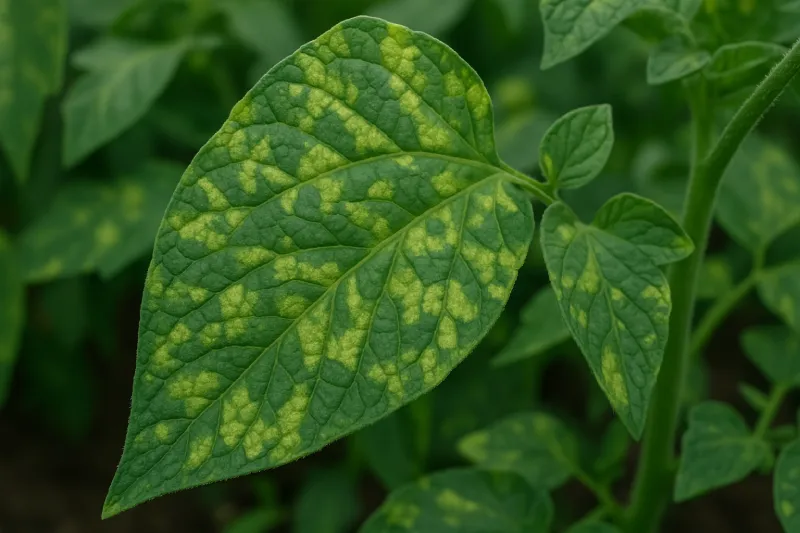
Identification: Symptoms vary by virus and plant, but a common sign is a mosaic or mottling of light and dark green on the leaves. Young leaves may emerge bumpy, curled, or misshapen (called “shoestring” effect when leaves are narrow and stringy in CMV). You might see irregular yellow patches, ring-like spots, or streaks on foliage. Infected plants are often stunted and may have fewer flowers or bear small, deformed fruits. For example, cucumbers or squash with mosaic virus can be warty or oddly shaped, and green peppers may get dark rings or mottling on the fruit. The mosaic pattern on leaves is the clearest indicator – a patchwork of yellowish and green areas rather than a uniform color. These symptoms can sometimes be confused with nutrient deficiencies, but mosaic patterns coupled with distortion and a lack of response to fertilization usually point to a virus. If multiple plant species in your garden show similar mosaic symptoms, a virus is very likely at play.
Prevention: Insect control is key – manage aphids, whiteflies, thrips, and beetles, since these often carry viruses from plant to plant. Use reflective mulches or foil strips around plants to confuse aphids and repel them (reducing virus transmission) and consider yellow sticky traps to monitor for winged aphids. Remove weed hosts (like milkweed, plantain, wild cucumber) that can harbor mosaic viruses and attract aphids. Disinfect tools regularly, especially when pruning or handling multiple plants (a 10% bleach solution or milk solution can inactivate many viruses). Avoid using tobacco products around tomato/pepper plants (Tobacco Mosaic Virus can spread from smoker’s hands). Plant resistant varieties when available – for example, some cucumber and squash varieties have bred-in resistance to mosaic viruses. Finally, remove any suspect plants immediately – if a plant shows mosaic symptoms, uproot it and dispose of it far from the garden to limit the virus source.
Treatment: There is no cure for viral infections in plants – once a plant is infected, the best action is to remove and destroy it to prevent the virus from serving as a source to infect others. Upon spotting mosaic virus, pull out the affected plant (including roots) and discard it in the trash (do not compost). Control the vectors: for aphids, gentle spraying of plants with soapy water can reduce their numbers, and remove nearby weeds that might harbor viruses. Sometimes aluminum foil or reflective mulch under plants helps repel aphids and reduce virus spread in a bed. If only a part of the plant is showing symptoms (and you’re unsure if it’s virus), you can isolate that plant and watch it, but generally it’s safer to rogue it out. Neighboring plants that are not yet showing symptoms might still be infected, so keep a close eye on them for any mottling. Continue controlling insects throughout the season. In the case of tobacco mosaic virus (TMV), which can persist on surfaces, wash your hands and tools after handling infected plants. Important: Mosaic viruses often ride into gardens on infected seeds or transplants. Use reputable sources for seed, and don’t save seeds from infected plants. Many commercial seed producers test for common seed-borne viruses. For transplants, inspect them at purchase – look for any mottling or strange leaf patterns. By focusing on prevention and quick removal of infected plants, you can often keep mosaic viruses from becoming a major issue in your vegetable garden.
