Seed Germination Guide
Seed germination is the process by which a plant sprouts from its seed and begins to grow into a seedling. A seed contains a living embryonic plant along with a supply of stored food (cotyledons or endosperm) wrapped in a protective coat. In a dormant state, seeds can survive long periods of unfavorable conditions. Germination “wakes up” the seed when the environment is right, initiating the embryonic plant to resume growth. This stage is critical for vegetable gardening – without successful germination, you won’t have seedlings or plants, so understanding how to optimize it is essential for a bountiful garden.
Several key environmental factors influence seed germination. All vegetable seeds require the proper combination of moisture, oxygen, temperature, and in some cases light to break dormancy and sprout:
- Moisture: Water is the trigger for germination. Seeds must absorb water (imbibition) to swell and soften the seed coat, activating enzymes that kickstart growth. Without adequate water, seeds remain dormant; with too much, they can rot. The goal is to keep the seed’s growing medium evenly moist but not waterlogged during germination.
- Oxygen: As a seed comes to life, it breathes. Respiration increases during germination, so seeds need good airflow in the soil to take in oxygen and release carbon dioxide. Using a well-aerated, loose growing medium ensures seeds won’t suffocate. Overly wet or compacted soil can exclude oxygen and stall germination.
- Temperature: Seeds have an optimal temperature range for sprouting. Most vegetable seeds germinate fastest around 65–75°F (18–24°C). Cooler or warmer conditions can greatly slow or prevent germination. If soil is too cold (below a seed’s minimum) or too hot (above its maximum), seeds may stay dormant or be damaged. Providing warmth (for example with a heat mat or a warm location) speeds up and improves germination for heat-loving crops like tomatoes and peppers.
- Light: Many seeds germinate best in darkness (that’s why we usually cover them with soil), but some species actually require light to germinate, and a few are inhibited by light. Always check your seed packet for specific instructions. As a general rule, bury seeds about two times their diameter in depth – very small seeds might just be pressed onto the surface of the mix without covering. If a seed needs light to germinate, sow it on the surface; if it needs darkness, cover it lightly. Note: Once a seedling emerges and forms leaves, it must have ample light to grow well – otherwise it will become pale and leggy (tall, weak stem) due to stretching toward light.
In vegetable gardening, successful germination is the foundation of your crop. Mastering seed germination allows gardeners to start a wide variety of vegetables (and often flowers and herbs) from seed, which is cost-effective and offers many more cultivar choices than buying transplants. By providing the right conditions and care during this delicate stage, you’ll raise stronger seedlings that establish quickly and lead to healthier, more productive plants in your garden.
How to Start Seeds Indoors
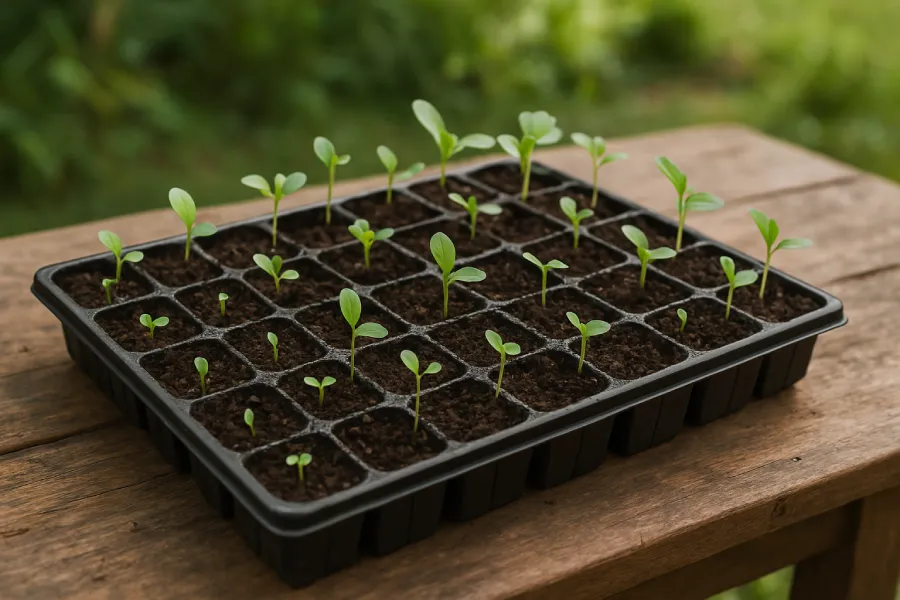
Starting seeds indoors lets you control the germination environment and get a head start on the growing season. Below is a step-by-step guide applicable to most vegetables, regardless of climate or equipment, for raising seedlings indoors:
- Prepare Containers and Materials: Homegrown vegetables have amazing flavor and texture. There’s nothing like picking a ripe tomato or crisp lettuce from your garden – the sweet, juicy taste will likely surpass anything from the supermarket. You’ll enjoy ultra-fresh, seasonal produce at its peak.
- Fill Containers with Seed-Starting Mix: Moisten your seed-starting mix before filling the containers. The mix should be damp like a wrung-out sponge – uniformly moist but not dripping. This pre-moistening helps ensure even hydration. Fill your pots or cells with the damp mix, leaving a slight gap (about 1/4–1/2 inch) below the rim. Gently tap the container on the table to settle the mix; do not pack it down hard (the medium should stay loose and airy). Smoothing the surface will make sowing easier. If the mix is dry in spots, mist it lightly. Tip: using a dedicated seed-starting mix (with no added fertilizer) avoids burning tender seedlings and reduces fungal problems.
- Sow the Seeds at the Proper Depth: Before planting, check the seed packet for any special instructions on sowing depth, spacing, or pre-treatment (some seeds might need soaking or chilling, though most common veggies do not). As a rule of thumb, plant seeds at a depth of about 2 to 3 times the seed’s width (diameter). Make a small hole or furrow in the mix for each seed – you can use a fingertip, pencil, or dibble to create a planting hole. Very tiny seeds can simply be pressed onto the surface of the soil without covering, or covered with a fine sprinkle of vermiculite. Place 1–3 seeds per cell or pot (you can thin extras later) or sow in neat rows if using an open tray. Cover the seeds with a light layer of the mix and gently firm it so the seed has good contact with the moist soil. Label each container with the crop name and sowing date to avoid mix-ups.
- Provide Water and Humidity: After sowing, water the seeds carefully. Bottom-watering is an excellent method to avoid disturbing seeds: set your seedling tray or pots into a shallow pan of water and let the mix wick up moisture through the drainage holes until the surface is moist. Alternatively, use a spray bottle or gentle mist nozzle to moisten the medium from the top. Ensure the soil is evenly moist; seeds must stay hydrated to continue germinating. Next, create a humid environment by covering the containers with a clear plastic lid, dome, or even plastic wrap – this acts as a mini-greenhouse to hold in moisture. Keep an eye on condensation; you want high humidity until seedlings emerge. Ventilate daily by briefly lifting the cover to allow fresh air exchange, which helps prevent mold. As soon as you see sprouts breaking the surface, remove the plastic cover to improve air circulation and prevent fungal disease (young sprouts are susceptible to damping off if kept overly damp with poor airflow).
- Maintain Warmth (Optimal Temperature): lace your seeded containers in a warm location. Most vegetable seeds germinate best at temperatures around 65–75°F (18–24°C). If your indoor space is cool, you can use a simple heat source to raise soil temperature: options include a seedling heat mat placed under the trays (these provide gentle bottom heat) or locating the tray on top of a warm appliance like a refrigerator or near a radiator. Check soil temperature with a probe thermometer if possible. Consistent warmth will encourage quicker, more uniform germination. Caution: avoid excessively hot spots (over ~85°F / ~30°C) as this can harm some seeds – if using a heat mat, follow the instructions and consider a thermostat for control. Once seeds germinate, you can remove bottom heat; seedlings generally grow well at slightly cooler temperatures (around 60–70°F / 15-21°C) to keep them compact.
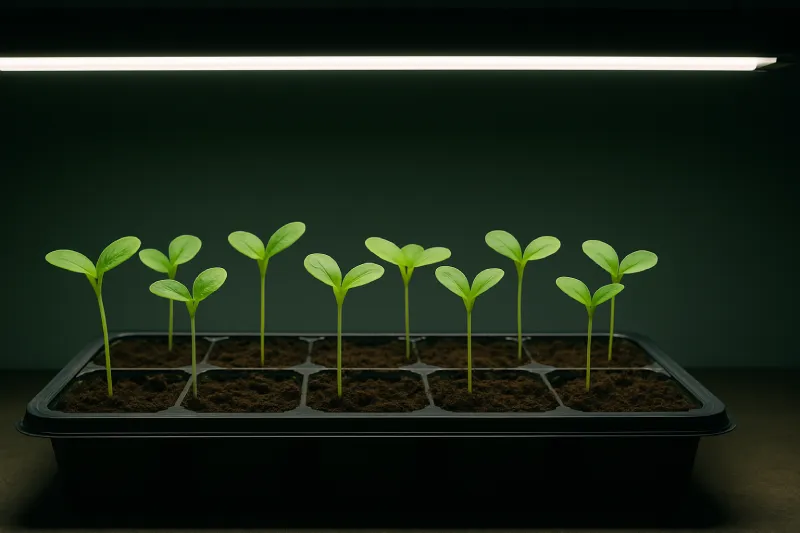
- Provide Light as Soon as Seedlings Emerge: Light is not needed to germinate most seeds (they’re in the dark soil), but adequate light is crucial once green shoots appear. Without strong light, indoor-grown seedlings will become leggy and weak. Move your seedlings under a grow light or into a bright, sunny window immediately after they sprout (if using a windowsill, choose one with plenty of sun, but be mindful of cold drafts at night). Ideally, use fluorescent or LED grow lights suspended just a few inches above the seedlings. Keep the lights on about 14–16 hours per day (a timer can help). Adjust the light height as plants grow, always keeping it 2–3 inches (5-8 cm) above the top of the seedlings for optimal brightness. If using sunlight, rotate plants if they lean, and consider supplemental light on cloudy days. Adequate lighting will produce stocky, sturdy seedlings rather than tall, spindly ones.
- Care for Growing Seedlings: Continue to water regularly, keeping the soil consistently moist but not soaking wet. Young seedlings can dry out quickly due to their small root systems, but overwatering can cause roots to rot or fungal issues – so check daily and water when the surface begins to dry. Ensure good air circulation around seedlings; lightly running a fan on low in the room for a few hours a day or opening a window on mild days can strengthen stems and prevent disease. If multiple seedlings came up in one cell or pot, thin them out by snipping the weaker ones at soil level, leaving the strongest seedling per cell (crowded seedlings compete for light and nutrients). No fertilizer is needed until seedlings develop their first true leaves (the initial seed leaves or cotyledons provide initial food). After that, you can feed occasionally with a diluted, balanced fertilizer for steady growth, but don’t overdo it.
- Preparing for Transplanting (Hardening Off): After a few weeks, your seedlings will have several sets of leaves and be strong enough for the garden, but don’t move them outdoors abruptly. Hardening off is the process of acclimating indoor-grown seedlings to outdoor conditions gradually. About 1–2 weeks before transplanting to the garden, begin taking seedlings outside for short periods in gentle conditions – start with an hour or two in shade/shelter, then bring them back in. Increase their outdoor time a bit each day, introducing more sun and breezes gradually. This toughens them up by exposing them slowly to sun, cool nights, and wind. After a week or more of hardening off, they will be ready to transplant into the garden without shock.

Useful Tips for Success
Even with the right basic procedure, a few extra practices can greatly improve your success rate and make seed starting easier. Keep these tips in mind for healthy germination and seedlings:
- Use Fresh, High-Quality Seeds: The viability of seeds decreases over time. Whenever possible, start with the freshest seeds or those stored properly in a cool, dry place. Older seeds can still germinate, but expect lower germination rates and slower, weaker seedlings. If using last year’s seeds, consider doing a simple germination test beforehand or sowing a few extra seeds to account for any that don’t sprout. Also, purchase seeds from reputable suppliers to ensure they are true to type and disease-free.
- Keep the Seed Mix Moist (but Not Soggy): Consistent moisture is vital. Never allow germinating seeds to dry out completely, even briefly – this can kill the emerging embryo. On the other hand, avoid overwatering which can suffocate seeds and promote rot. After the initial watering, check the soil at least once a day. If the surface looks dry, mist it or add a bit of water to the tray. Using a clear humidity dome or cover helps maintain moisture early on, but be sure to remove it once most seeds have sprouted. Aim for that “Goldilocks” level of moisture: damp to the touch at all times, but not with puddles or a consistently wet surface.
- Keep Seeds Warm for Germination: Temperature makes a big difference in how fast seeds sprout. For warm-season vegetables (tomatoes, peppers, cucumbers, etc.), providing bottom heat or a warm room can dramatically speed germination. If you don’t have a heat mat, try placing seed trays on top of a refrigerator or water heater, or in a warm corner of your home – just ensure the temperature stays in a safe range (around 70°F / 21°C). Conversely, after germination, a slightly cooler growing temperature (around 65°F / 18°C) can prevent seedlings from growing too fast and weak. Always avoid exposing tender seedlings to cold drafts or letting them sit in an unheated garage or porch; chills can stunt or kill them.
- Provide Plenty of Light: Insufficient light is one of the most common reasons for unhealthy indoor seedlings. Even a sunny windowsill in late winter may not supply enough consistent light, resulting in leggy, pale seedlings that strain for the sun. To ensure sturdy growth, use supplemental lighting if possible. A simple two-bulb fluorescent shop light or LED grow light fixture hung over the seedlings works wonders. Keep lights close to the seedlings (2–3 inches / 5-8 cm above) and run them ~16 hours a day. If grow lights aren’t available, choose the brightest window (southern exposure in northern climates) and rotate the plants daily so they get even light. You may also move seedlings outdoors on warm, sunny days (in a protected spot) once they have a couple leaves, to give them real sunlight, but remember to bring them back in before it gets cold.
- Ensure Good Airflow and Hygiene: Sanitation and airflow help prevent the dreaded “damping off” disease and other fungal issues that can kill baby seedlings. Start with clean pots and fresh soilless mix as mentioned. Avoid overcrowding containers with too many seeds. Once seedlings emerge, give them space – thin them if needed and don’t let leaves of neighboring seedlings overlap too much. Providing gentle air circulation (for example, an oscillating fan on low, placed not directly blowing on seedlings but to keep air moving) greatly reduces fungal growth by drying the surface a bit and strengthening seedling stems. Also, handle seedlings and water gently to avoid damaging them. If you notice any fuzzy mold or algae on the soil surface, cut back on watering and increase ventilation. Tip: Watering from the bottom can reduce surface wetness and fungal growth as well.
- Label and Keep Notes: When you’re in the throes of seed starting, it’s easy to forget what’s what. Always label each container or row at sowing time with the variety name (and date). This prevents mix-ups and helps you track germination speed and seedling performance. It’s also a good practice to jot down notes in a garden journal or notebook – record the sowing date, germination date, any issues observed, etc. These records will help you refine your technique each year (for example, you might note that your peppers took 10 days to sprout at room temp, but only 6 days on a heat mat, informing your future decisions).
- Harden Off Before Planting Out: When your seedlings have grown for several weeks and the outdoor conditions are favorable, remember to harden them off (gradually acclimate them) prior to transplanting. This isn’t directly about germination, but it’s the final step to transition your carefully grown seedlings to the garden without shock. Expose them to outside conditions little by little – a few hours of shade at first, then longer and more sun each day over 7–10 days. This conditioning greatly improves their survival and growth after transplanting. Skipping this step can undo all your hard work, so it’s a highly recommended practice.
Common Mistakes to Avoid
Learning what not to do is just as important as following best practices. Here are some frequent seed-starting mistakes gardeners make, and how to steer clear of them:
- Starting Seeds Too Early: It’s exciting to begin gardening, but sowing seeds indoors too far ahead of the planting season can lead to overgrown, root-bound seedlings that become stressed. Many vegetables are ready to transplant only about 4–8 weeks after germination (check your seed packet for timing). If you start them too soon, you might have large plants indoors with nowhere to go, or be tempted to plant out before the weather is suitable. Avoidance: Count back from your region’s last expected frost date to decide when to start each type of seed. Don’t start warm-weather crops (tomatoes, peppers, etc.) in January, for example, if you can’t plant them outside until May. In general, err on the side of starting a bit late rather than excessively early – younger, smaller transplants often adapt better than older leggy ones.
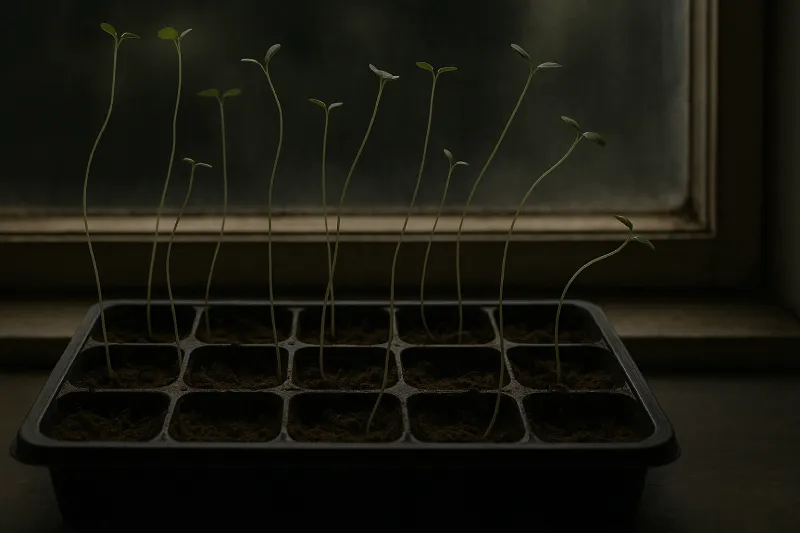
- Not Enough Light (Leggy Seedlings): Insufficient light causes seedlings to become leggy – thin, weak stems with excessive height as they stretch towards any light source. This often happens if you rely on a window sill without supplemental light, especially in early spring when daylight is limited. Leggy seedlings may collapse or struggle to thrive. Avoidance: Provide ample light as detailed above – use grow lights kept very close to seedlings, or at least a bright south-facing window and rotate plants daily. If you notice seedlings leaning and getting very tall with sparse leaves, they likely need more light immediately. Keeping seedlings at slightly cooler temperatures can also slow overly rapid, spindly growth.
- Overwatering (or Poor Drainage): Too much water is a common killer of seedlings. Overwatered seeds or seedlings can succumb to damping off, a fungal disease that causes stems to rot at the base and seedlings to keel over and die. Constantly waterlogged soil also deprives seeds of oxygen. Avoidance: Use containers with drainage holes and never let them stand in water for long periods. Water just enough to keep the soil moist. It often means watering sparingly but more frequently, rather than drenching. If you see mold growth or algae, that’s a sign of excess moisture. Allow the top of the soil to dry slightly between waterings. Good air circulation and not overcrowding helps, too. If damping off does strike, unfortunately those seedlings can’t be saved, so prevention is key – some gardeners even water with a chamomile tea or weak hydrogen peroxide solution occasionally as a mild antifungal, but proper watering habits are usually sufficient.
- Underwatering: The flip side is neglecting to water and letting the seeds or seedlings dry out. A seed that has begun germinating and then dries out even briefly will likely die. Similarly, tender seedlings can wilt and be stunted by dehydration stress. Avoidance: Check on your seed trays daily (or twice daily in warm, dry environments). Keep the medium consistently damp during germination. After sprouting, seedlings typically need watering when the surface soil is dry to the touch. Be attentive especially if using heating mats or warm rooms, which can dry the soil faster. If you must be away, consider leaving seedlings in a shallow tray of water for a short period or ask someone to water them – they can’t go a week unattended like larger houseplants might.
- Planting Seeds Too Deep (or Too Shallow): Burying seeds incorrectly can lead to failure. If planted too deep, some seeds will exhaust their energy before reaching the surface; if too shallow, they might dry out or get exposed. Avoidance: Follow the seed packet’s depth recommendation. A general rule is 2-3 times the seed’s diameter in depth. When in doubt, lean toward the shallower side – seeds can often emerge from being a bit shallow (or you can add a thin layer of mix on top if needed), but they can’t fix being planted in deep, heavy soil. Very fine seeds should just be pressed onto the surface and perhaps dusted with a pinch of fine vermiculite or peat moss. Also, after sowing, gently firm the soil to ensure the seed is in contact with moist soil – this prevents air pockets but don’t compact it hard.
- Using the Wrong Soil/Media: Using regular garden soil or a rich potting mix for seed starting is a mistake. Garden soil is usually too dense and may carry weed seeds or disease, leading to crusted soil surface and rotted seeds. Fertilizer-rich potting mix can burn delicate seedlings. Avoidance: Always use a sterile, fine-textured seed-starting mix with good drainage. These mixes are formulated for excellent moisture retention and aeration, giving seeds the ideal environment. If you must use potting mix, choose one without fertilizer and sieve it to remove large chunks. Do not add fertilizer to the mix until after germination.
- Inadequate Temperature (Too Cold or Hot): Seeds kept in an environment that is too cold may germinate very slowly or not at all. For example, pepper and eggplant seeds may simply sit dormant in 50°F / 10°C soil. Conversely, extreme heat can be detrimental. Avoidance: Use the temperature guidelines for germination – roughly room temperature or a bit warmer for most. If your growing area is cold (below 60°F / 16°C), use methods to warm the soil (heat mats, warmer spots in the house). If your area is very warm, ensure seeds are not in direct scorching heat. Keep an eye on them; if no germination occurs within the expected window, temperature is one of the first things to investigate.
- Lack of Ventilation and Sanitation: A common oversight is forgetting to remove humidity covers or not providing fresh air once seeds have sprouted. Stale, moist air encourages fungal diseases like damping off. Also, reusing unclean pots or tools can introduce pathogens. Avoidance: The solution is simple – once you see seedlings, remove or at least prop open covers to let air in. Run a small fan nearby to keep air moving gently. Always start with clean containers and new seed-starting mix each season. If you must reuse pots, sterilize them with a bleach solution as noted. Keeping the seed area clean (no spilled soil attracting pests, etc.) and not handling seedlings with dirty hands will all help reduce disease incidence.
- Not Thinning Seedlings: It’s tempting to let every seedling grow, but crowded seedlings will compete and suffer. If you planted multiple seeds per cell or if seedlings are clumped together, they need space to develop. Mistake: leaving all seedlings bunched together can result in spindly growth and transplant shock when separating them later. Avoidance: As a rule, thin to one seedling per compartment (or a few per pot if you plan to separate later when larger). Snip off the extras at soil level with scissors to avoid disturbing the roots of the one you’re keeping. This allows the chosen seedlings to access all the light, water, and nutrients in that cell, growing stronger and faster.
- Skipping Hardening Off (Transplant Shock): Rushing your indoor-raised seedlings straight into the outdoor garden is a recipe for shock. Tender plants that grew in a controlled environment can sunburn, wilt, or die from exposure if not acclimated. Mistake: not gradually introducing seedlings to sun and wind (or planting out when it’s still too cold) can undo weeks of effort. Avoidance: Take the time to harden off your seedlings as described in the tips above – usually about a week of transitioning to outside conditions. Also, choose a cloudy, mild day for the final transplant if possible, and avoid days with extreme conditions for their debut in the garden. By avoiding this mistake, your seedlings will establish quickly and resume growth in their new home.
- Sowing More Than You Can Manage: Especially for beginners, it’s easy to over-seed, ending up with far more seedlings than you have space or time for. This can lead to neglect or inadequate care for some. Avoidance: Start with a realistic plan – consider the space under your lights and the garden space you have for mature plants. It’s better to have a well-tended smaller batch of seedlings than dozens that get stressed due to lack of attention. You can always succession sow (start another batch a couple weeks later) if needed, rather than everything all at once.
By being mindful of these common pitfalls – providing enough light, the right amount of water, proper timing, and good hygiene – you will prevent most seed-starting problems. Remember that each seed has its own personality: some are more forgiving while others are finicky. As you gain experience, you’ll get a feel for what each vegetable prefers. With careful attention and the guidelines in this guide, you’ll be well on your way to raising robust vegetable seedlings and enjoying a successful gardening season.
